
For most Mac users, a large chunk of the hard drive space is occupied by photos, and that’s especially true in the case of high-resolution photos. To better manage the hard drive space occupied by image files and to make them more accessible, Apple offers its proprietary app “Photos” on all macOS versions. This app helps users organize their pictures in one place, maintain versions (if needed), and sort them based on different parameters.
But like any other app, the Mac Photos app too often faces glitches. Users sometimes report that they’re facing issues while trying to access their photos saved in the Mac Photo Library, and are seeing errors like “the library could not be opened” or “cannot open photos on Mac”. So what could be the reason for this error, and more importantly, how can you resolve it?
Join us as we take a deeper dive and find out the answers to those questions.
Table of Contents
Why is the Photos app unable to open images from the Mac photo library?
There could be several reasons for this:
- The default location of the Photo Library in Mac is /Users/~/Pictures/Photos Library.photoslibrary. If you have moved the library from its default location to, say, an external drive, this error could mean that the file system of the external drive isn’t supported by macOS and as a result, the macOS can’t find the library.
- You could see this error if your user account’s read/write permissions have been changed and you don’t have access to the library anymore.
- If none of the above scenarios fit your case, then there’s a high possibility that the photos you are trying to open are damaged or corrupted.
Now let’s see how you can regain access to your photos in each of the above situations.
How to open images from the Mac photo library
Scenario 1 – If the photo library is moved to an unsupported external drive
When moving the Mac photo library to an external drive, it is important to update the default path of the System Photo Library to that external drive. Additionally, formatting that drives to macOS Extended (Journaled) or APFS file format is recommended, because that is the default file system supported by macOS. Ideally, the format operation should be done before moving the files on the external drive.
If you haven’t performed either of the two operations, the only way to regain access to your photos is to move them back to your Mac.
Scenario 2 – If your account permissions aren’t correct
Update your account to have the correct access permission as follows:
- Right-click the “Photos Library.photoslibrary” folder in Finder
- Click the Get Info option in the menu. A dialog will open with the information about the folder.
- Go to Sharing & Permissions tab in the dialog and check the privileges assigned to the current user account
- If the permissions are “read-only”, click the lock icon to make changes. Change the “Read-only” privilege to “Read and Write”
Scenario 3 – If the photos are damaged or corrupted
Photos in your Mac can become corrupt due to many reasons like software incompatibility, outdated Photos app, or conflict between devices like the camera and your macOS system. If any of these cases happen, the Photos app won’t be able to open the images until they are repaired.
The next section covers some of the easiest ways to repair damaged photos on Mac.
How to repair corrupt or damaged photos on Mac?
a). Use the Photo Repair Library tool
Apple provides a proprietary tool for fixing corrupted photos called the Photo Repair Library tool. As its name suggests, this tool can be used to repair damaged photos.
Here are the steps you should follow to use this tool:
- If the Photos app is already open, first close it and then re-launch it while holding down the Option and Command keys simultaneously as you click on the Photos app icon.
- A window will open. Look for the Repair option in it and click on it to start the repair process
- If prompted, please enter your username and password to start the repair process.
- Now the Repair Library tool will analyze the image in your Photo Library and repair any defects or inconsistencies it finds. Depending on the Photo Library size, it might take some time to complete the photo repair process. After the repair process is completed, the Photos app will open the Photo Library
b). Update Photos App
One of the reasons why the “cannot open photos on Mac” error arises is outdated Photos app. Users who have upgraded to macOS Catalina or have installed any other major OS update but have not updated the Photos app are more likely to face this error.
To update the Photos app do the following:
- Click the Apple icon and then select App Store from the dropdown menu
- Click the Updates tab from the top menu. You will see all pending updates you need to install on your Mac
- Look for the Photos app and see if there are any updates you need to install for it.
- Alternatively, you can click Update All to install all available updates.
- Wait for the update process to be completed
Now try opening Photos from the library with the Photos app.
c). Use Stellar Photo Repair
Stellar Photo Repair can fix damaged photos from your external drive, Mac’s internal drive, SD card, storage media used in the camera, CCTV, iPhone, and several other devices. Repairing photos with Stellar Photo Repair is an easy task, thanks to the application’s user-friendly interface. It allows you to repair several photos at one go, saving your valuable time.
This is how you can repair photos that won’t open in the Photos app on Mac.
- Go to the official website for Stellar Photo Repair and download the application’s installer for free using the “Free Download” button
- Install the application with default preferences, and once done, launch it.
- Click on the “Add File” option on the home screen to import the images to be repaired. Select one or multiple photos that you want to repair and click on the Repair button

Image 1 – Add photos to be repaired
- Now wait for the repair process to complete. It may take some time depending on the number of photos you’re trying to repair.

Image 2 – Allow the repair process to finish
- When the repair process finishes, preview the files by clicking on them. The preview will be shown on the right-hand side of the interface.
- If you’re satisfied with the preview, save the repaired photos at the desired location by clicking the checkbox next to them and clicking on the Save Repaired Files button
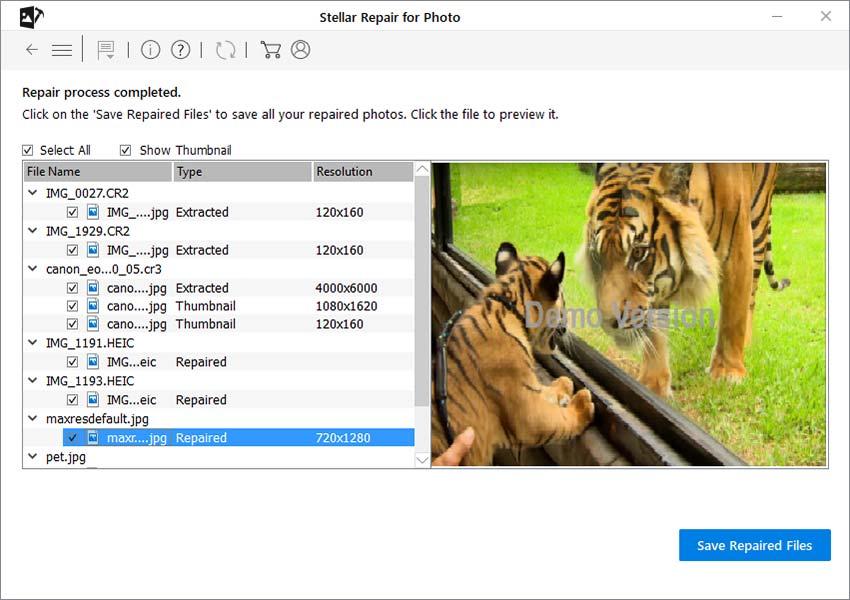
Image 3 – Preview and save repaired photos
Once the photos have been repaired, you can transfer them to the System Photo Library folder so that you can view them with the Photos app.
Wrapping it up
Now that you know how to retrieve corrupt photos from Mac, you should not feel stressed if none of your photos are accessible through the System Photo Library on your Mac. Try one of the tricks described in this post to know how these photos can be repaired. If that doesn’t work, you can always use Stellar Photo Repair software to get back your photos.
Hello, I am a professional writer and blogger at Adclays.com. I love to explore the latest topics and write on those topics. I spend the maximum of my time on reading and writing interesting topics which provide valuable piece of information to my readers whether it comes to the latest fashion, technology, healthy lifestyle, business information, etc. Explore my writings by visiting the website.